


Un grifo construido para durar más que el fregadero donde está montado, si se instala bien la primera vez.
Instalar un grifo de cocina uno mismo es algo realista para la mayoría de las personas, siempre y cuando el nuevo grifo utilice la misma configuración de orificios que el anterior. Es un trabajo de 1 a 2 horas con herramientas manuales básicas: una llave para lavabo, una llave inglesa, cinta de teflón y una llave Allen. Cambiar el número de orificios, pasar a una configuración de montaje en pared o encontrar válvulas de cierre corroídas debajo del fregadero son situaciones en las que llamar a un fontanero tiene más sentido que intentar hacerlo uno mismo.
Antes de empezar: cada grifo Insideast incluye su propia hoja de datos descargable y guía de instalación, disponibles directamente en la página del producto, con el espaciado exacto de los orificios, números de pieza y diagramas paso a paso para ese modelo específico. Si algo en su configuración no coincide, nuestro equipo de atención al cliente responde rápidamente y le guía a través del proceso, y también están acostumbrados a atender solicitudes personalizadas. Espaciado de orificios inusual, un grosor de encimera no estándar, un acabado específico, si es una solicitud razonable, trabajaremos con usted para que encaje.
- Un cambio de grifo de montaje en encimera similar al existente tarda aproximadamente de 1 a 2 horas con herramientas manuales básicas.
- La configuración de los orificios es lo más importante: los grifos de un orificio, dos orificios (puente) y tres orificios se montan de manera diferente.
- La cinta de teflón en cada conexión roscada y un lavado completo de 1 minuto antes del primer uso previenen la mayoría de las fugas tempranas.
- Cada grifo Insideast tiene su propia hoja de datos descargable y guía de instalación en su página de producto.
- La instalación en la pared es un trabajo completamente diferente, que implica la pared en lugar de la encimera.
Herramientas que necesitará
Esa es la lista completa para una instalación estándar de montaje en encimera. No se requieren herramientas especiales, lo cual es parte de la razón por la que este es uno de los trabajos de fontanería más accesibles para un aficionado al bricolaje con confianza. Si su modelo requiere algo más allá de esta lista, se indicará en la guía de instalación específica de ese producto.
Extracción del grifo viejo
Comience cerrando las válvulas de cierre de agua fría y caliente debajo del fregadero, luego abra el grifo para liberar cualquier presión que aún quede en las tuberías. Desconecte las tuberías de suministro de las válvulas de cierre, colocando un cubo o toalla debajo, ya que aún quedará algo de agua en las mangueras.
Desde debajo del fregadero, retire las tuercas de montaje que sujetan el grifo viejo a la cubierta. Estas a menudo están corroídas o cubiertas con masilla de fontanería vieja, por lo que una llave para lavabo resulta muy útil aquí, ya que está diseñada para alcanzar y girar tuercas en espacios estrechos e incómodos a los que una llave estándar no puede acceder. Una vez que se quitan las tuercas, levante el grifo viejo desde arriba y raspe cualquier residuo de masilla o sellador viejo de la superficie de la cubierta antes de continuar.

Un trabajo manejable
Los mismos pasos, lo haga quien lo haga
Ya sea un fontanero o usted debajo del fregadero, la secuencia no cambia: monte el cuerpo, asegúrelo desde abajo, conecte las manijas y luego las tuberías de suministro. Conocer el orden y tener las herramientas adecuadas a mano es lo que en gran medida diferencia una instalación sencilla de una frustrante.
Instalación paso a paso
La secuencia principal es la misma en todas las configuraciones: inserte el cuerpo del grifo a través del orificio o los orificios de la encimera, asegúrelo por debajo con la junta de montaje y la tuerca, conecte las manijas si están separadas del caño y luego conecte las líneas de suministro. Lo que cambia entre los grifos de un orificio, dos orificios y tres orificios es cuántos componentes está colocando y cómo se conectan entre sí antes de instalar las líneas de suministro. Esta guía cubre la instalación de montaje en encimera, el estándar para fregaderos de cocina; los grifos de montaje en pared siguen un proceso diferente, que se cubre a continuación.
Grifos de un orificio
Un grifo de un orificio es la configuración más sencilla: un cuerpo que contiene el caño y la manija pasa a través de un orificio en la encimera. Coloque el grifo a través del orificio, deslice la junta de la encimera y la junta de montaje desde abajo, enrosque la tuerca de brida en el espárrago roscado y apriete con una llave para lavabo. Si la manija es una pieza separada, instale su tapa y coloque cinta de teflón en las roscas antes de conectar las mangueras de suministro.

Guía de instalación del grifo de un orificio Insideast, de la hoja de datos del producto.
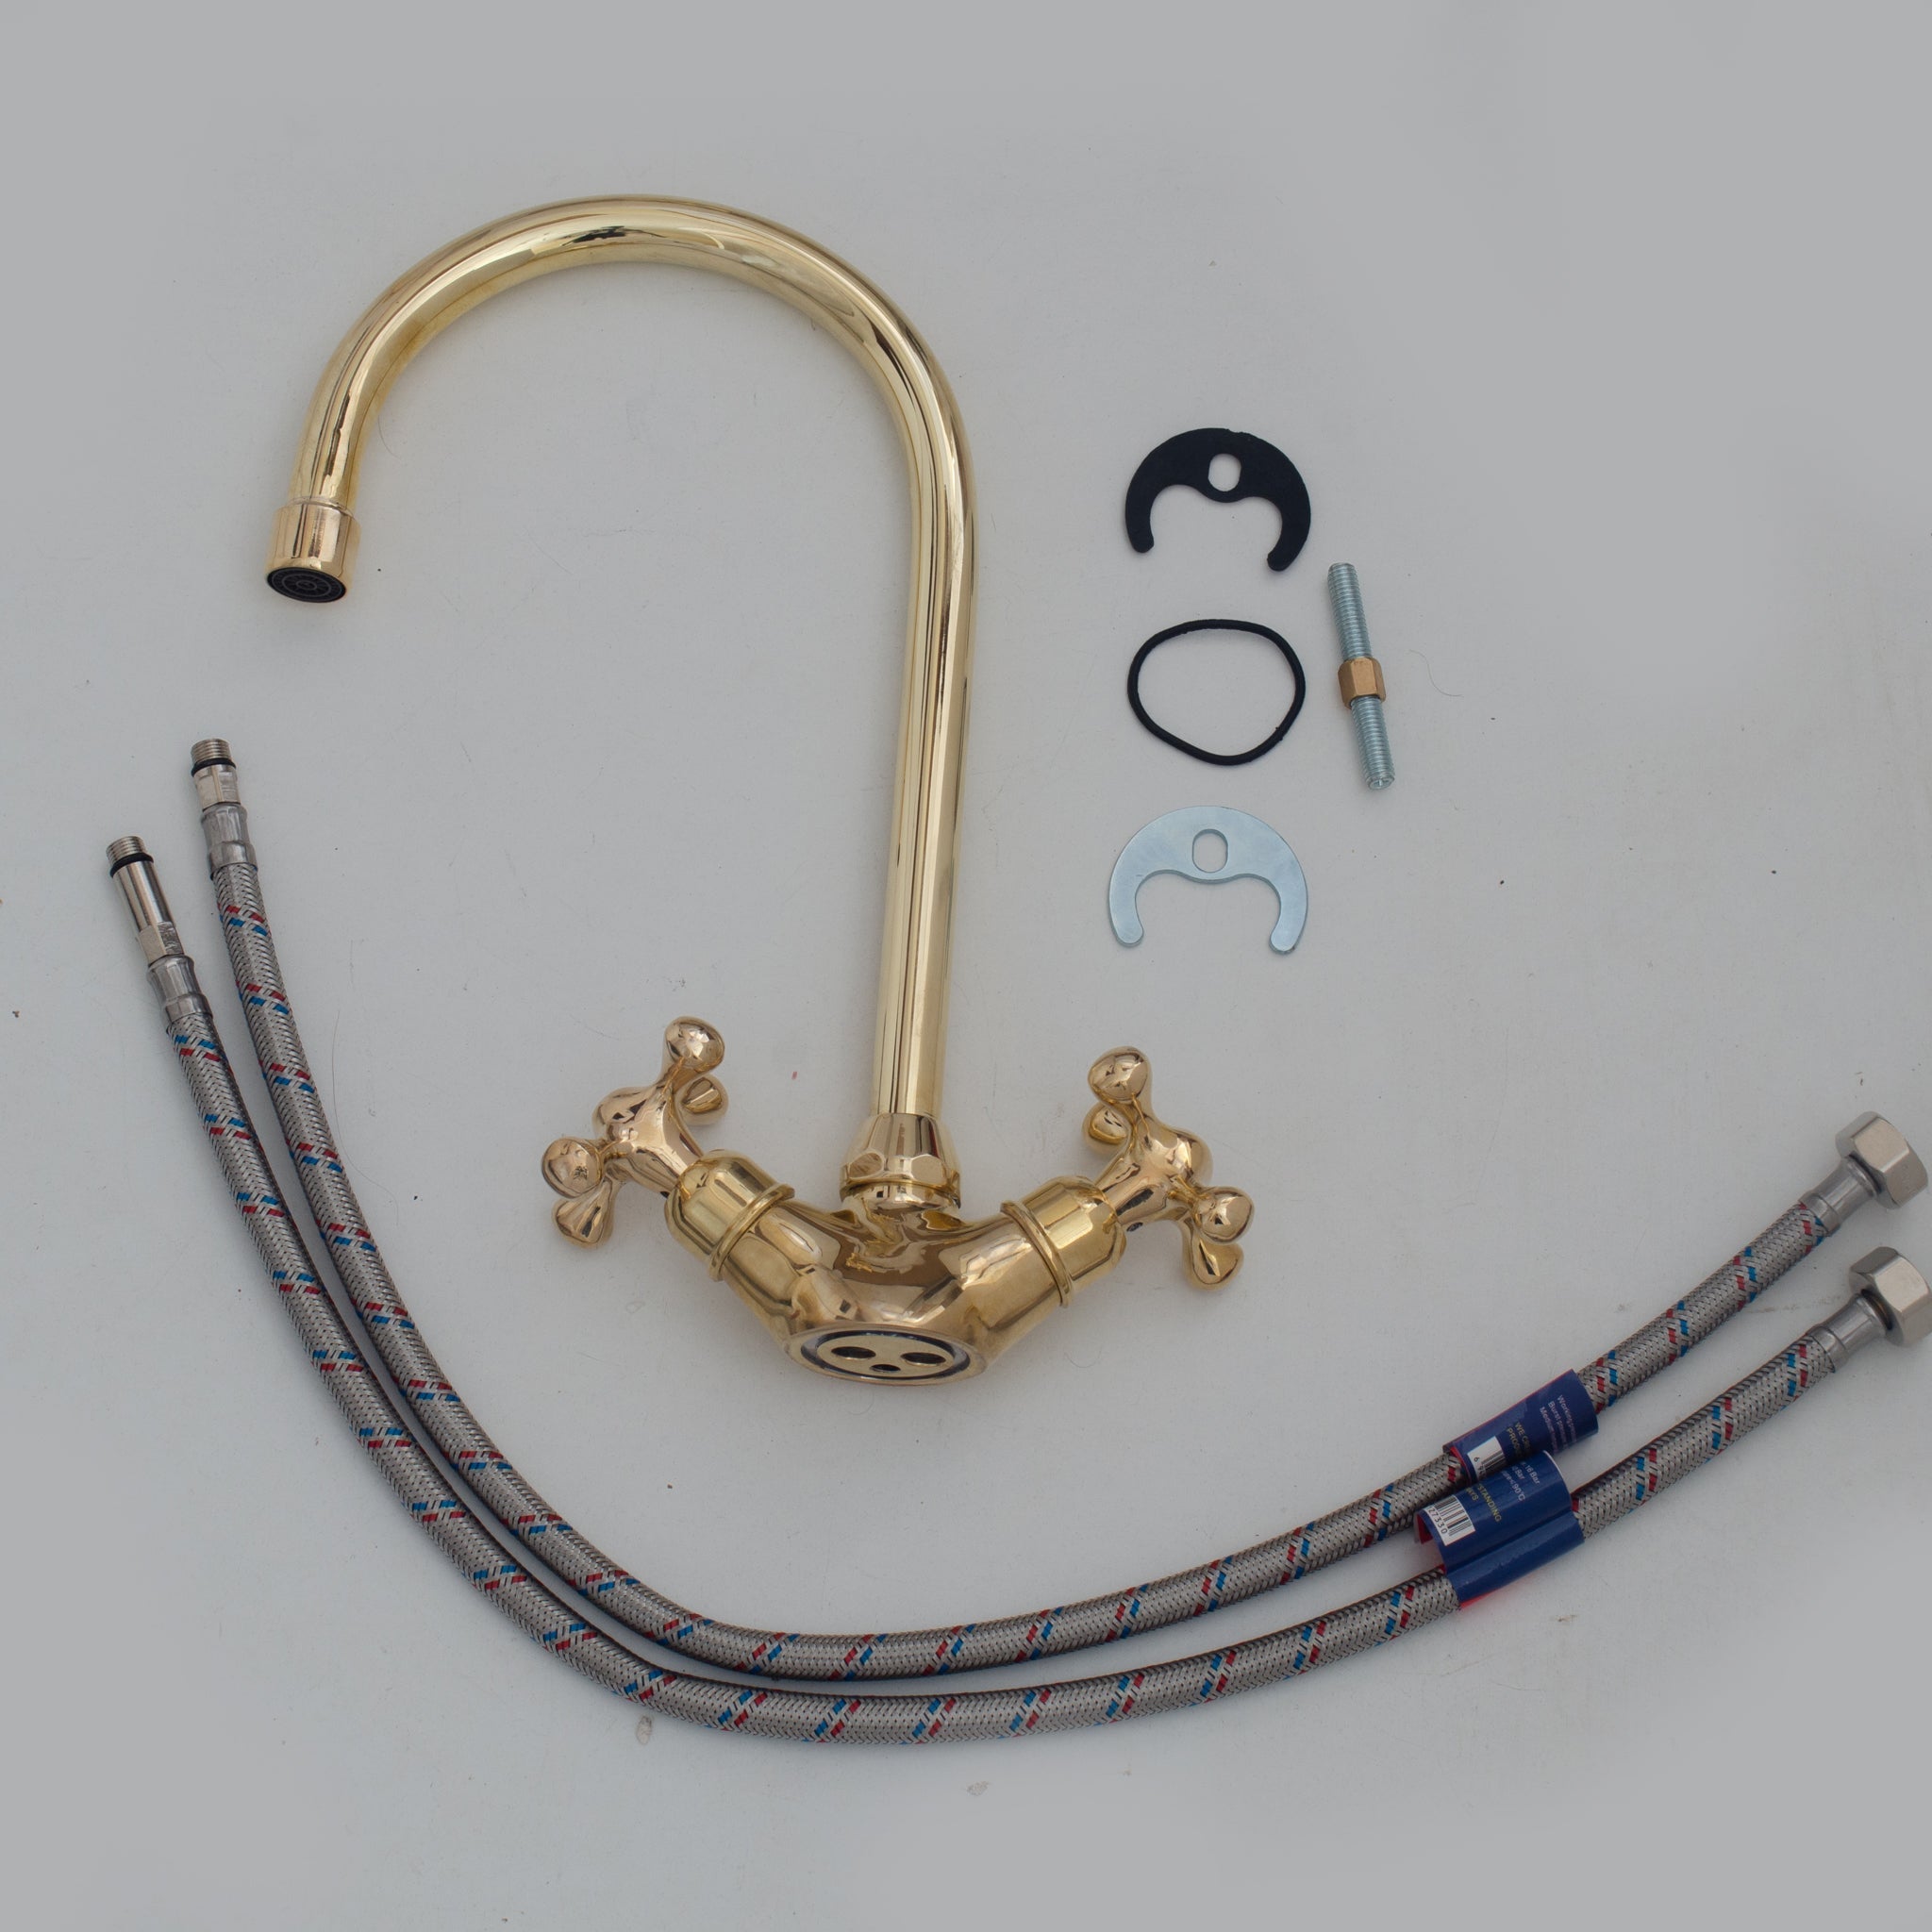
Cada grifo de un orificio de Insideast se envía completo con herrajes de montaje, juntas y mangueras de suministro trenzadas.

"Me encanta, lo compré por separado del fregadero (en la foto) y lo instalé en nuestro nuevo bar en la azotea en casa en Canarias."
Grifos de dos orificios (puente)
Los grifos de puente separan los dos grifos del caño, conectados por un puente horizontal expuesto, y se montan a través de dos orificios en la cubierta en lugar de uno. Coloque el cuerpo del grifo a través de ambos orificios, luego desde abajo instale la junta de montaje y la tuerca de brida en cada lado, apretándolas uniformemente para que el puente quede nivelado. Los cartuchos y el caño se unen al cuerpo a continuación, seguidos de las tapas de los grifos.

Guía de instalación del grifo de puente (dos orificios) Insideast, de la hoja de datos del producto.

"Muchas gracias por el grifo de latón absolutamente impresionante, superó nuestras expectativas. La calidad es excelente. Su servicio y actualizaciones fueron tranquilizadores. No podría estar más feliz con todo el proceso de compra de esta empresa."
Grifos de tres orificios
Los grifos de tres orificios (extendidos) separan el caño y ambos grifos en piezas individuales, más un cuarto orificio si se incluye un rociador lateral, conectados debajo de la encimera por mangueras conectoras flexibles en lugar de un puente rígido. El espaciado de los orificios en estos es típicamente personalizable en lugar de fijo, así que confirme el espaciado en la hoja de datos de su modelo antes de perforar nada. Inserte cada componente a través de su orificio, asegúrelo con herrajes de montaje desde abajo, luego conecte los conectores flexibles entre los grifos y el caño antes de instalar las líneas de suministro principales.

Guía de instalación del grifo de tres orificios Insideast, de la hoja de datos del producto.

"¡El grifo y el desagüe son preciosos! El servicio al cliente del vendedor para ayudar fue excelente."
Errores comunes de instalación
Conexión de las tuberías de suministro
Las tuberías de suministro flexibles trenzadas conectan las válvulas de cierre a las entradas de agua fría y caliente del grifo. Envuelva con cinta de teflón ambos extremos de cada conexión, luego apriete a mano antes de terminar con una llave, teniendo cuidado de no apretar demasiado los accesorios de compresión. Las tuberías de suministro de cobre y latón combinan naturalmente con un accesorio de latón o cobre, ya que ambos materiales soportan la soldadura y los cambios de temperatura de manera consistente con el tiempo, razón por la cual los accesorios Insideast a menudo se instalan junto con tuberías de cobre en lugar de las líneas cromadas estándar.
Una vez que todo esté conectado, abra lentamente las válvulas de cierre y verifique cada unión en busca de goteos antes de considerar que el trabajo está terminado. Deje correr el agua durante al menos un minuto para purgar las tuberías, según el paso de purgado en cada guía de instalación de Insideast.
Montaje en pared vs. montaje en encimera
Todo en esta guía cubre la instalación de montaje en encimera, donde el grifo pasa a través de la encimera o la cubierta del fregadero, que es la configuración estándar para los fregaderos de cocina. Los grifos de montaje en pared son un trabajo diferente: el cuerpo del grifo se fija a la pared sobre el fregadero, y las tuberías de suministro pasan por dentro de la pared en lugar de subir por la encimera, lo que generalmente significa abrir paneles de yeso o azulejos en lugar de trabajar desde debajo de un armario. Si está considerando un grifo de montaje en pared, consulte la guía completa de grifos de montaje en pared para ver estilos, altura de montaje y lo que realmente implica esa instalación.
Cuándo llamar a un fontanero
Llame a un fontanero si las válvulas de cierre debajo del fregadero están viejas, corroídas o no giran, ya que forzar una válvula atascada puede romper la tubería de suministro que hay detrás. Lo mismo ocurre con cualquier instalación que cambie la configuración de los orificios, que pase a una instalación de montaje en pared o que revele daños inesperados una vez que se retira el grifo viejo, como un suelo de armario blando o dañado por el agua. Nada de eso es señal de que haya hecho algo mal; simplemente está fuera del alcance de un simple cambio.
Preguntas frecuentes
¿Puedo instalar un grifo de cocina yo mismo?
Sí, para un cambio sencillo de montaje en cubierta donde el nuevo grifo utiliza la misma configuración de orificios que el anterior. Se necesitan herramientas manuales básicas y aproximadamente de 1 a 2 horas. Si va a cambiar la configuración de los orificios, a una instalación de montaje en pared, o si sus válvulas de cierre están viejas y corroídas, llame a un fontanero.
¿Necesito un fontanero para instalar un grifo de cocina?
No para un reemplazo estándar de montaje en encimera igual por igual. Sí necesita un fontanero si la instalación implica abrir una pared para un grifo de montaje en pared, cambiar el número o el espaciado de los orificios de la encimera, o si encuentra válvulas de cierre corroídas, atascadas o con fugas una vez que esté debajo del fregadero.
¿Cuáles son los errores comunes en la instalación de grifos de cocina?
Los más comunes: saltarse la cinta de teflón en las conexiones roscadas, apretar demasiado la tuerca de montaje o las líneas de suministro, olvidar la junta de la plataforma, no hacer coincidir el espaciado de los orificios con la encimera y no purgar las líneas durante al menos un minuto antes del primer uso. Todos son evitables siguiendo la guía de instalación para su modelo específico.
¿Qué sujeta un grifo en su lugar?
Una tuerca de montaje y una junta (a veces llamada placa en C o tuerca de brida) apretadas desde debajo de la encimera, enroscadas en el vástago del grifo o en el perno roscado. En configuraciones de varios orificios, cada manija y el caño se aseguran de la misma manera, una tuerca por orificio.
¿Cuánto tiempo se tarda en instalar un grifo de cocina?
Un cambio de grifo de montaje en encimera similar al existente suele tardar de 1 a 2 horas, la mayor parte de las cuales se dedica a retirar el grifo viejo y a limpiar décadas de masilla endurecida o acumulación de minerales. La nueva instalación en sí, una vez limpia la encimera, suele tardar de 30 a 45 minutos.
Cada grifo de cocina Insideast se envía con su propia hoja de datos descargable y guía de instalación, y nuestro equipo está a su disposición para cualquier cosa específica de su configuración. Examine la colección completa de grifos de cocina para encontrar su configuración, o explore los grifos de cocina tipo puente específicamente.


